Do you wished a platform to share your feelings and information with the world ? A means to express creative thoughts by writing. Blogging can fulfill all these aspirations. How to start a WordPress blog ? This must be coming to your mind. As you have no technical knowledge. I had this same feeling when I started blogging. I started blogging the hard way. Wished there was a website like this to guide me when I started blogging.
Since you are new in this blogging community, you need a guidance to help you be on the right ground. And make no errors. With my personal experience, you will find it very easy to create a blog. You don’t have to be a computer specialist to make a blog. With my guidance you will make a perfect blog and make money from it. Follow my free easy beginner’s step-by-step guide.
Benefits of Blogging: What Can You Achieve By Blogging ?
Before you start to make your blog. You need to have a clear picture in your mind. What is your purpose of creating the blog. In case you know the reasons you can skip this section and move to the next one. Here is a list of important ones
- Earn money : Blogging requires few dollars to operate.It can become your full time profession. Bloggers around the world are making lot of money by writing. If you are willing to work hard then sky is the limit
- Business Promotion: If you want to market and publicize your business , blogging is an amazing platform. You will get a huge online customer base for your products.
- Be a Writer: Writing your thoughts and information, will make you an expert writer.
- Sharing Information : You can share your perspective, ideas to the whole world by blogging.
- Unlimited Freedom : A blog and can operated from any part of the world. Write when you like and enjoy unlimited happiness. No more 9am – 5pm work routine.
6 Steps For How To Start A WordPress Blog
- Choose Topic For Blogging
- Select a Blogging Platform
- Select Web Host & A Domain Name
- Installing WordPress
- Customizing & Designing Blog
- Writing & Publishing First Article
STEP 1. Choose Topic For Blogging
Blogging is way of expressing you opinions and information. To start a blog you need to have a topic in mind. The topic for blogging should be one of the following.
- A topic should be one that interests you. Something that you would love to discuss again & again. It could be fashion?travel? health?Then only you can shine in the world of blogging.
- If you are making a blog to promote a product, service or business. Then your blog topic should talk about your business. Blogging is a cheap way to connect your product with masses
- Your profession can be the topic. Writing about your professional experiences can guide & motivate other people in this profession.
- Life experiences in general can also be your blog topic. Anything from sad to happy moments in life. How you overcame a disease?, how it feels after giving birth? etc.
- You can pick clear niche in one area. A niche is a one focused area under a large area. Suppose you want to make a blog related to kitchen. You can pick one particular area in this kitchen topic that is called niche. Say you picked coffeemaker? or mugs? or glasses?. This way you will stamp your authority.
One thing is sure whatever topic you have chosen there must be many other’s already writing on that topic. Your personal perspective on this topic will make your blog unique from others. And this uniqueness will attract lot of blog visitors. It will act as a dictionary on one area.
[expand title=”What To Do In Case You Are Still Confused Regarding The Topic For Blogging?”]
Today you can start blogging with any topic that appeals you in some way. Later on you can change the topic. We all do it after we loose interest in that topic. In this case I recommend that you select a domain name that is neutral to topic. See the name of the my blog – feedtip.com. It can be used for technology, news, fashion, home or anything [/expand]
STEP 2. Select A Blogging Platform
You need a right blogging platform where you can create blog easily and requires no coding. Easy to customize as your blog grows bigger.
There are plenty of blogging platforms available. You can create your blog on WordPress, Blogger, Tumbler, Wix, Joomla etc. Out of all these, WordPress is NO.1 used platform. It is preferred all over the world

There are over 74 million WordPress websites all over the world. Over 59% CMS market share. It is the choice of 52% top bloggers. My blog which you are seeing right now is made on WordPress. Why it is so widely used
- WordPress is free to install, modify and use. You can create any type of blog or website.
- Setting up a blog on WordPress is very easy.
- There are huge number of free resources available in WordPress – themes, layouts, plugins etc. These resources are not freely available on many other blogging platforms.
- A WordPress blog is highly customizable. You can change themes, add unlimited features & functions by using plugins.
- Easy to manage a WordPress blog. You can update themes, plugins, WordPress software with one click
- WordPress is safe and secure from internet threats.
Now WordPress is your choice after reading. There are 2 options in WordPress platform
- WordPress.com – This is a free platform to start your blog. You don’t have to buy hosting service or the domain name. It has limited availability of free resources in terms of plugins, themes etc
- WordPress.org – This the favorite choice of professional bloggers. Over 90% blogs around the world are running on WordPress.org. You can have any domain extension – .com, net, org etc to domain name. It has huge directory of freely available resources- Plugins, themes & many add-ons. You install a free WordPress software on a paid web hosting to run your blog. A web hosting is a service which stores all your blog content (files,images, videos etc) and makes your blog visible to everyone on internet. I am using this platform to run my blogs. WordPress.org is my recommendation for starting a blog.
Why I recommend WordPress.org To Create A Blog ?
A self hosted WordPress.org blog has many advantages versus a freely hosted WordPress blog at WordPress.com or having a blog at other free platforms like Blogger, Wix etc. Below are some important ones.
- You cannot make money from a blog hosted on free platforms.As you are not allowed to put various ads and affiliate programs.
- Limited blog customization options at free platforms.You cannot add new functions as the blog grows. Visitor experience is bad as you don’t have a complete control on blog design due to these limits. You will be never be taken seriously by companies who want to advertise their products on your website.
- The speed of blog at free platforms is slow due to limited bandwith
- There is a limit of 3GB space for photos/videos in your free blogging platforms.That is very less in blog creation
A a self hosted WordPress blog has no such limitations. You can put various ads and affiliate programs with ease.Thus making money is easy. There are over 45000 Free Plugins & 6200 Free Themes available at WordPress.org directory. More & More themes as well as plugins are added everyday. By using these plugins & themes, you create a professional looking blog. Adding new functions like forums, subscriptions etc are so simple & easy. No other limitations like speed & space. As more bandwidth and storage space can be added when you need.
It is a big NOOOO to such free platforms. The right approach is to create a Self Hosted WordPress.org blog
Now follow my simple steps as how to create a self hosted blog in WordPress .
STEP 3. Select A Web Hosting Service & A Domain Name
To start a self hosted WordPress you need both web hosting service & domain name. A web hosting is a service which stores all your blog content (files,images, videos etc) and makes your blog visible to everyone on internet. Domain name is your blog address which a visitor types in his browser to open your blog. No web hosting & domain name means no blog.
A typical web hosting service charges are $8 per month onward. Cost of buying a domain name is $10-$15 per year. Domain name is bought from the web hosting service. There are lot of hosting companies in the market. One name that standout from all hosting choices and I highly recommend Bluehost. It provides reliable cheap hosting for WordPress. Hosting costs just $3.95 per month. On top of it you get a FREE domain name for first year. Number 1 recommended hosting company by WordPress.org. It is very easy to set up a WordPress blog on Bluehost. These following reasons will make you agree as why you should host a WordPress blog on Bluehost.
- It is the choice of over 2 million websites around the world. It is the top hosting company of 2018
- Bluehost has a easy and simple to use interface. Cpanel is user friendly. Easy to install a wordpress blog with just one click
- It is no 1 in website uptime that is 99.99%. Your website is online round the clock
- Get a FREE domain name when you sign up with Bluehost
- WordPress at Bluehost is FREE
- 24X7 Technical support of Bluehost is excellent. Ready to help you for all your queries.
- You get a free SSL Certificate. This make your website secure from threats and attacks.
- The best part is a self hosted professional blog by using Bluehost. Monetizing becomes easy.
- Bluehost offers 30 day money back guarantee. Incase you are not happy with service or change your mind.
- Get a cheap top class web hosting for $3.95 per month. This is nothing when you earn thousands of dollar from your self hosted blog
By now you must have made your mind to start your blog on Bluehost. Follow below my steps for learning how to start a WordPress blog on Bluehost. After signing up for Bluehost, if you still have any doubts regarding choosing a plan, how to set up, selecting a pricing plan etc. Feel free to email me for any queries. I am here to help you out.
>>> Click Here To Go To > BlueHost & Start Your Blog <<
On Clicking Bluehost , It will open a new window. Click the green “Get Started Now” button.
Hosting Plan Selection
Clicking “Get Started Now ” will take you to the plan selection page. There are 3 plan options – Basic, Plus and Prime. All three plans have a FREE domain. I recommend you should use the basic plan to start WordPress blog. It hosts single website. This plan is the cheapest plan. You pay $3.95 per month if you buy the hosting for 36 months. When in future you want to launch more WordPress websites you can upgrade to plus plan/prime plan. This gives you the option of unlimited website hosting. Bluehost is simply amazing because of this unlimited factor.
Domain Selection
On clicking green button “select” under the plan, it will take you to the Domain Registration Page. This is where you get your FREE domain.
Domain is the name which people will type in the browser and visit your blog. Now you will we wondering what name shall I select. What name extension should one select. Shall I select .com , .net, .org or anything else. I recommend you should select .com extension as first choice. As this is the most popular used extension.
In case if you already have a domain type type it on the right. Or else type the name on the left and press next. If the name is available you will move to next account set up page. If your desired name is not available Bluehost will show you a list of available names similar to your typed name. This process is little frustrating as simple names you think might already have been taken.
The easy way to find the name is by thinking of the topic for which you are making the blog. Example if you want to make a blog on Fashion. You can use Latestfashion.com, Hifashion.com, TopFashion.com, Fashionquest.com.
Try modifying the name till what is available for registration
- What words are related to fashion – Style, Trend, Vogue, Fashion
- Words that can be added with main topic – Craze, Love, Idea, Top
- Other words you can try adding to main topic – My , Expert, Unique, Fun,
- Try adding or removing a letter to the word. For word Trend you can add “z” , ” Y”, “s” . You get a new word Trendz, Trendy, Trends or anything creative you like.
When your selected name is available, clicking next will take you to Account Setup & Package Information Page
[expand title=”What To Do In Case You Are Still Undecided On Domain Name Selection?”]
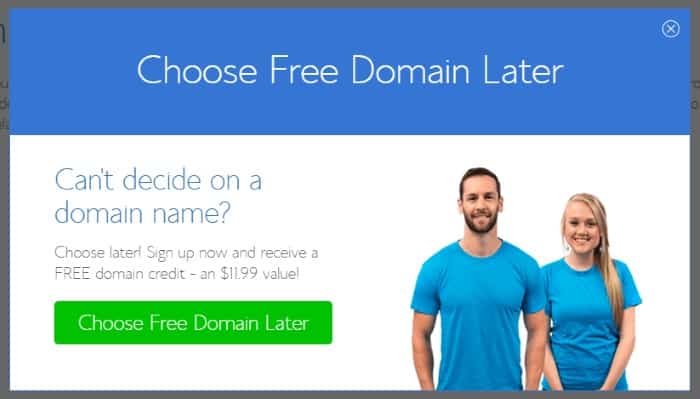
Bluehost gives you the option to choose the domain name later. Click “Choose Free Domain Later” button in pop screen or click link text “Choose Later !” at the bottom of domain registration page
[/expand]
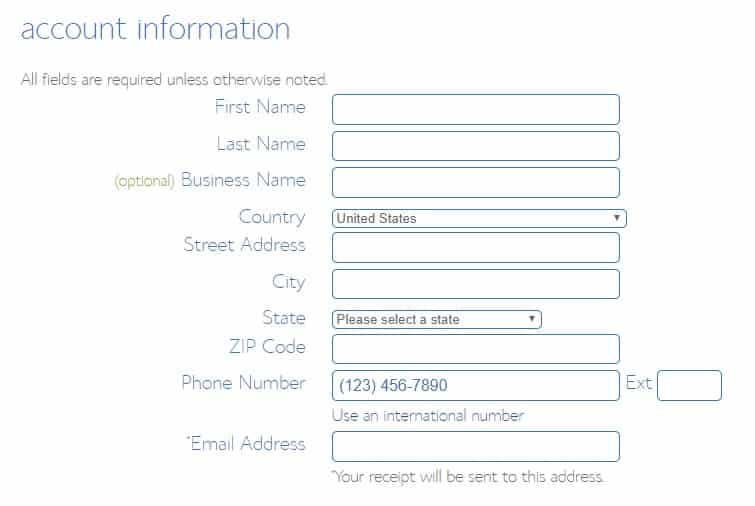
Account Set Up
At this page you fill personal details and billing information for account set up.
Select Account Plan
Scrolling down to package information. Select the account plan. This is choosing hosting duration. You are billed as per the year- 1,2,3 & 5 years. You are paying upfront. The cheapest plan is for 36 months. We recommend that you select 36 month account plan. As this plan offers best value for the money. A saving of $142.44. Super deal.
Going down package extras are optional. It is your decision whether you want to purchase or not. We generally do not recommend to purchase them now. As you can buy later if you think you need them.
Enter Billing Information
Fill billing information, agree service terms and click submit to complete.
Special Offers & Upgrades
Clicking submit will open a new page showing special offers & upgrades for you. Skip them by clicking “no thanks” link.
Password Creation Page
This page show your purchase was successful. You will receive various welcome mails from Bluehost regarding your created account.
It will ask you to create secure password. Click “create password” green button. It will take you to new window.
Create a new strong password in this window.
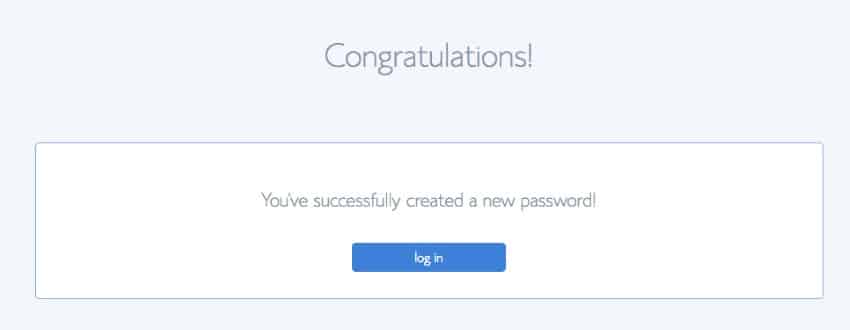
This new password will be used for account login . Click “Next” blue button. You will receive a congratulations page that you have created the new password. From here you will install WordPress
STEP 4. Installing WordPress On Bluehost
To install WordPress click “log in” blue button on this congratulation page
Skip Free Themes
Clicking “login in” blue button will open free themes selection window. Bluehost shows you a list of free themes you can use for your blog. No need to install themes right now. As themes can be easily installed later on. There are plenty of freely available themes from WordPress.org directory. There are 6200+ free themes available. So press “Skip this step” link at the bottom of the page
Clicking “Skip this step” link in free themes page will open a new page. You have two options either to build your WordPress website by clicking “Start Building” blue button or “go to my Bluehost account”.
At present your blog will be on temporary domain. New domains take 1 hour to a maximum 1 day for getting registered. When done, Bluehost will shift your blog automatically to registered domain. No point going to Bluehost account now. Let’s complete WordPress installation. Login to WordPress dashboard click “Start Building” blue button.
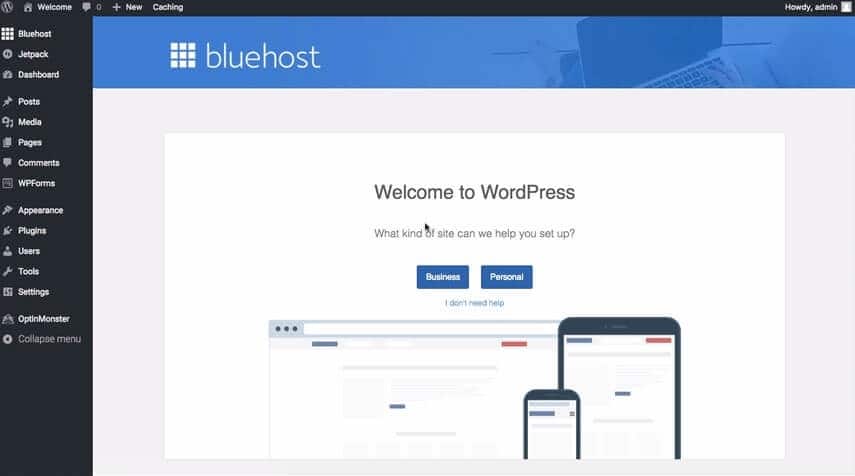
This is how a dashboard looks. Left hand side is the menu of WordPress dashboard. In the center you have Welcome to WordPress” message. Here Bluehost will ask you to help setting your blog. Click “I don’t need help” as you can do more easily by using the menu on the left hand side.
Launch Your Blog
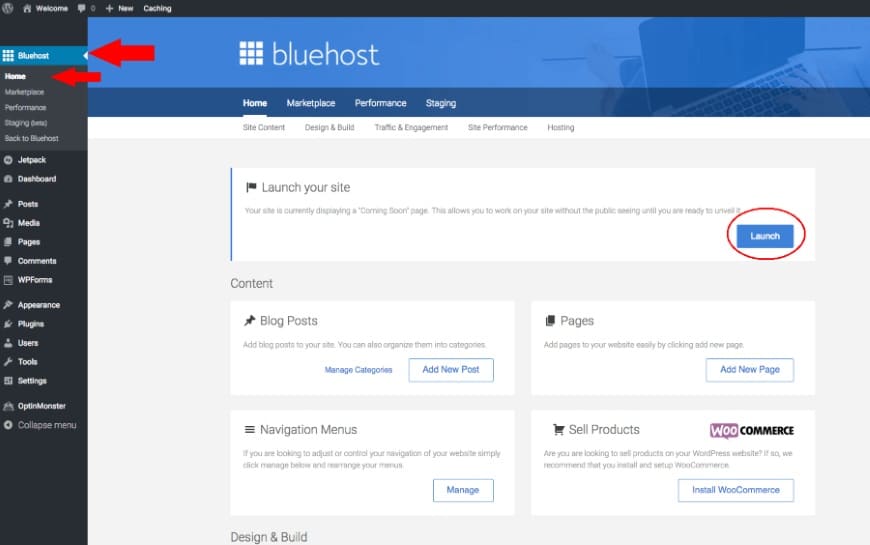
At present your blog homepage that is www.yourblog.com will show coming soon . The first step to make your blog go online. Click Bluehost>>Home on the left hand side. Click “Launch” blue button in the center where it is written Launch your site.
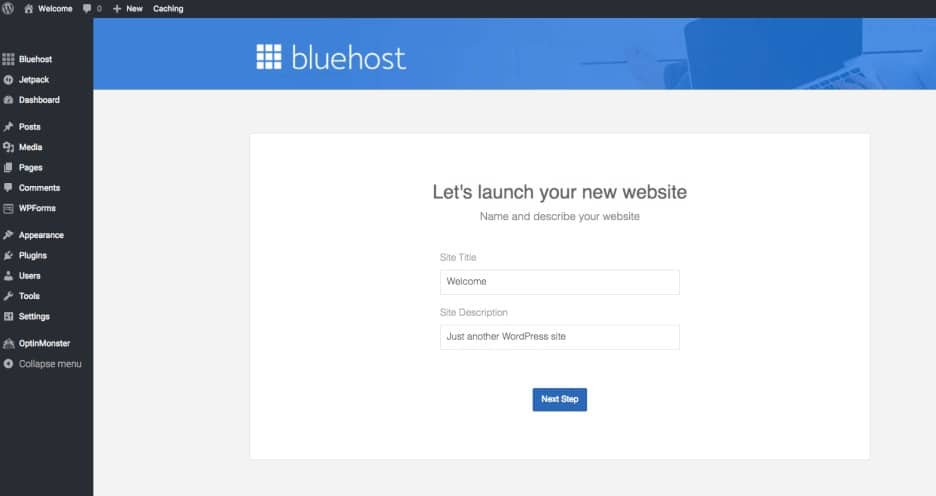
Clicking this button will open a new pop up. Over here you need to fill your blog name and blog description.
Now whoever visits your site URL, they will see your site name and description. It the the first step in making your blog going online. Installing WordPress is complete. Now let’s beautify & add functionality to your blog.
STEP 5. Customizing & Designing Blog
Installing Themes in WordPress
Let us customize the look of your blog. Make it look cool and exciting. Your journey in the blogging world would be full of fun
There are lot of WordPress themes available. Paid as well as free ones. Since you have just joined the blogging world, you should experiment with free themes first.
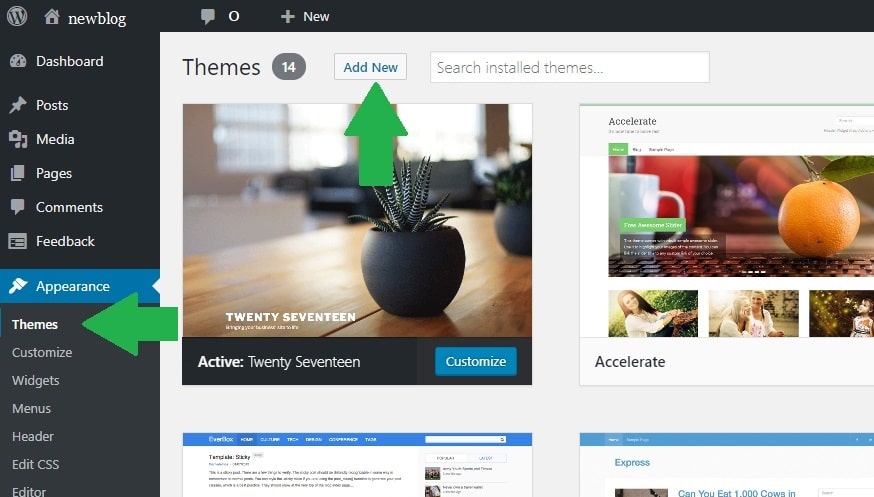
In the WordPress dashboard. Click Appearance on left hand side . Then click Themes.
Click Add new button on top.
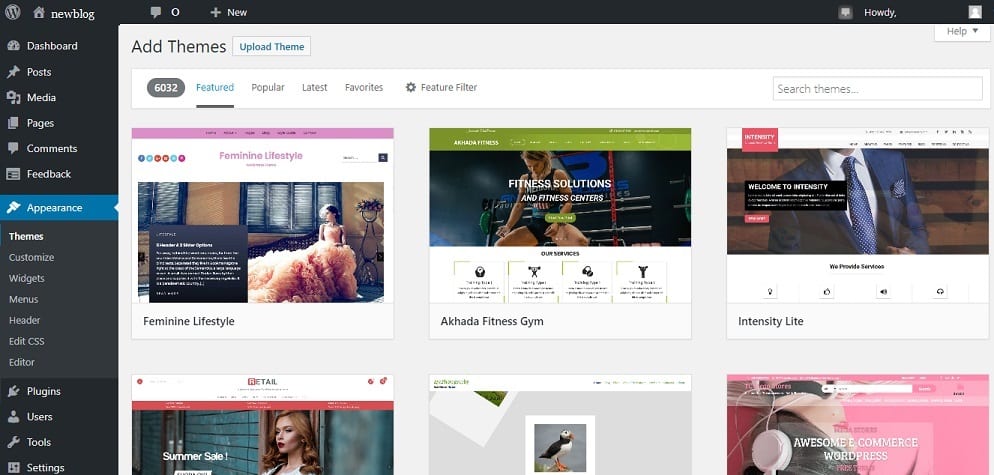
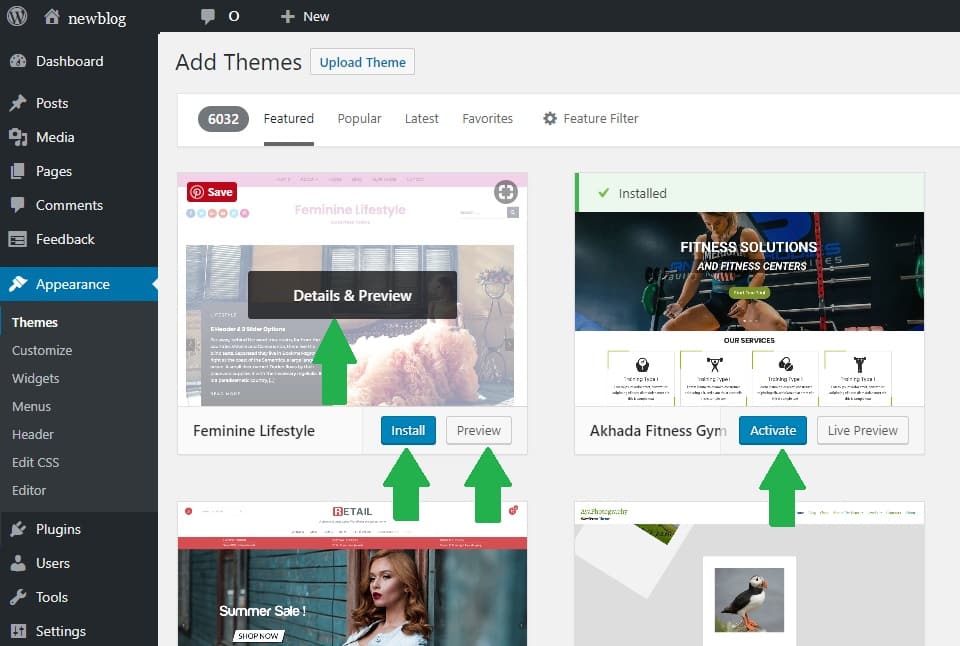
You will move to next screen. It will show you amazing list of freely available themes from WordPress.org themes directory. The themes can be sorted on the basis of featured, popular, latest, favorites and featured filter. Using Featured Filter guides you in blog theme selection as per your topic, features & layout. This will sort themes based on your requirement.
When you move the cursor over any theme. It will show three clickable buttons – 1) Details & Preview, 2) Install, 3) Preview. On clicking first button Details & Preview it shows themes details and live preview of the theme. On clicking Preview it shows how your blog looks in this theme. If you like theme click Install. The theme gets installed and now install button changes into Activate button. Only when you click Activate, your current theme changes into this new theme. You can always customize this new theme by clicking Customize under appearance on the left hand side menu
You will be confused to see so many themes. As there are 6200 freely available themes. Which theme I should select. My advice to you is to go for a clean & crisp looking theme. A clean theme ensures good visual presentation to your blog visitor.
In case your are not satisfied with themes. You can install your own chosen theme.
To install your chosen theme you need to click Upload Theme button next to the caption Add Themes.
Click Choose File to select the file from your computer. Then click Install Now
The theme is downloaded on your WordPress website but is not yet activated. In the next page click Activate link to activate the theme.
Bingo you have installed your chosen theme.
Free Themes Vs Premium Themes – Which One To Choose ?
Free themes are best way for someone one who is entering the blogging world. But these themes don’t have the customization and tools that premium themes offer you.
If you are willing to spend $50-$100 then you should go for premium themes. Premium themes have powerful tools which makes your website look professional, clean and sleek . Other important considerations for premium themes is that they offer you dedicated support staff to make you successful in the blogging world. Quality in the world of blogging goes miles.
Now the question comes where should I buy and which ones should I buy?
My recommended list of Premium themes
1. StudioPress Themes : They offer you themes based on Genesis framework. If you have gone through internet you would have seen 90% propagating to use Genesis framework. It makes your blog will look professional. WordPress is amazingly fast and efficient. First you need to install a Genesis Framework and then a Child theme. StudioPress are original creators of genesis frameworks. This is a genuine place for buying these themes. The best part of buying themes from StudioPress is that you can use on unlimited websites and get unlimited free future updates. Buying Genesis framework from other place is a dangerous thing as it may contain malicious code, which can destroy your website. This blog is you are seeing right now is based on Genesis framework and I am using Mai Lifestyle Pro theme. Both bought from Studiopress. My 2 websites are using this theme. To customize these theme you should have a coding knowledge or you will need to buy Design Palette Pro in case you have no knowledge of coding. It makes customization super easy. There are over 20+ child themes available at StudioPress. You can check my list of best genesis child themes.
2. Divi Theme : A great theme that offers you plenty of customization from elegant themes. This makes your website super cool with so many options. Second choice after StudioPress.
3. Avada Theme : This is no 1 downloaded theme at themeforest.net. Over 4.40 lakhs customers have purchased this theme. It offers amazing customization options. One of my website is running on this theme.
If you want amazing professional quality go for StudioPress themes. Themes based on Genesis framework are the best ones. Hope you have found and installed your theme.
You are ready for the next step.
Create Username & Log In Information
Click Users>>Add New on the left side vertical menu
Fill details in this page
In username write the name you want to to use to login into WordPress
Email is basically added in case you forget your password. New details are mailed to your email.
To fill password click “show password” next to Password. Add the password you desire.
The last most important thing . Select administrator from the drop down box next to Role.
Click Add New User.
Your WordPress login URL is http://yourblog.com/wp-admin . It looks like this
Fill username and password. Ticking remember me is optional. If you tick mark this, you won’t have to fill your username and password again for few days. It will allow direct access to WordPress admin panel.
This is how you enter WordPress website dashboard. A master panel is a place to customize your blogs and write your posts. Before writing your first post let’s add more functionality to the blog by adding plugins.
Plugins Installation & Customization
WordPress plugins are like apps of smartphone. It adds additional function or extends existing functions to our blogs. There are 55000+ free plugins available at WordPress directory. There is a plugin for any task you want to complete in your website. This makes self hosted WordPress blogs look so amazing. Tremendous customization.
These software bits by facilitating various tasks & adding new features makes our blog more visitor /admin friendly. Thus making money from blogs becomes easy.
You must be wondering what type of plugins I should install and how should I install.
Let us first discuss how to install WordPress plugins.
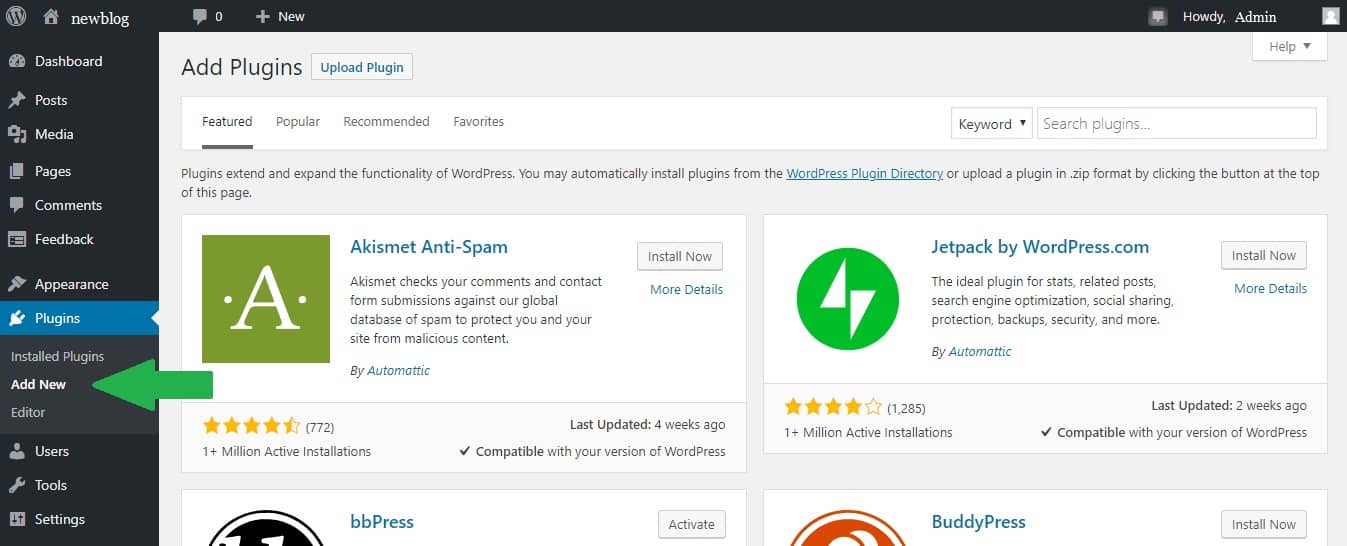
Click Plugins>>Add New on the left hand side bar.
WordPress.org shows various plugins in your dashboard window. Plugins are sorted on the basis of clickable horizontal menu at top- Featured, Popular, Recommended & Favorites. Featured shows a plugins as highlighted by WordPress.org. Popular shows you a list of highly installed plugins. Clicking Recommended shows you plugins based on your already installed plugins. Favorites shows a list of your marked favorite plugins.
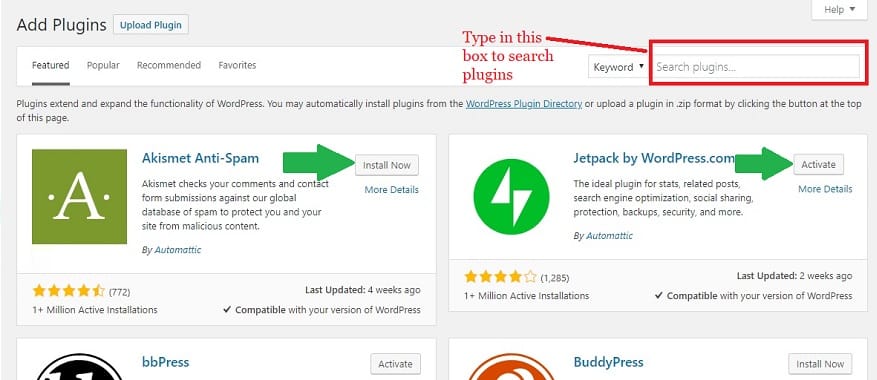
You can search the plugins by typing it’s name, author or tag in the search bar. Then press enter. The plugins are displayed. Each displayed plugin has clickable link – Install now & More Details. Clicking More Details shows plugin description. On clicking Install Now the plugin gets installed in your blog. Install Now button changes to Activate. Only on clicking Activate the plugin starts functioning on your blog.
You have learn’t how to install plugins. Now you will be wondering what plugins I should install since you are a beginner.
List of recommended plugins to install
1. Yoast SEO Plugin : This plugin optimizes your blog for search engine traffic. Your articles are searched by keywords and phrases. If you follow SEO principles in your blog it will lead to good amount of traffic. High traffic to to your blog is a billion dollar. Installing Yoast SEO plugin will optimize your blog. It makes SEO look so simple. Just install & activate the way I have told you.
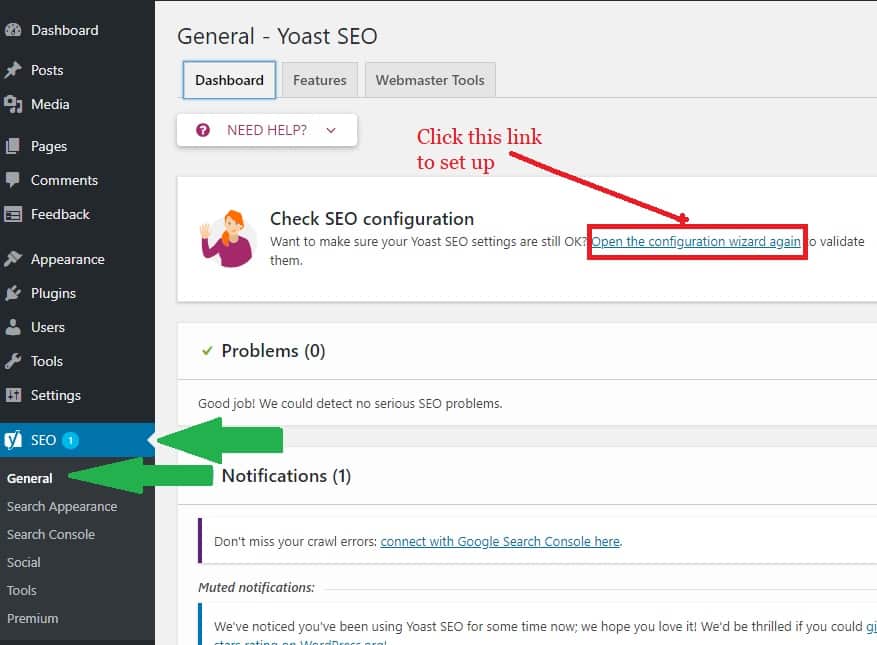
Click SEO>>General on left hand side menu of your wordpress dashboard. Click Open Configuration Wizard Again. Now set up by visiting this Yoast SEO Configuration Wizard link. After you have completed setup, you need to visit Yoast SEO User Guide to learn how to use it.
2. Akismet Anti-Spam Plugin : Spamming in comments is a big headache. It is a global phenomenon. To prevent spamming install and activate Akismet Anti-Spam Plugin. For set up click Akismet Guide
3. WP Super Cache : Enhances the speed of WordPress website by catching
4. UpdraftPlus : Creates a back up of your website in case something goes wrong. This is very important habbiy you need to carry regularly
5. Convertkit : Great email marketing tool for sending Emails & Newsletters to your blog readers
6. Imagify : This plugin will reduce the uploaded images size. Thus making your blog light and leading to increased website speed.
Setting Up Google Analytics
Google analytics is a very important tool to track site traffic. It gives you various information regarding the blog traffic- Number of page views, traffic from mobile or desktop, traffic from various sources and much more.
To set up first you need to create the account at google analytics . When you are done you need to insert the code in your blog. You need to insert the code in your themes header.php file or use insert headers & footers plugin.
Once done you can check various blog traffic stats from google analytics.
STEP 6. Creating & Publishing First Blog Post
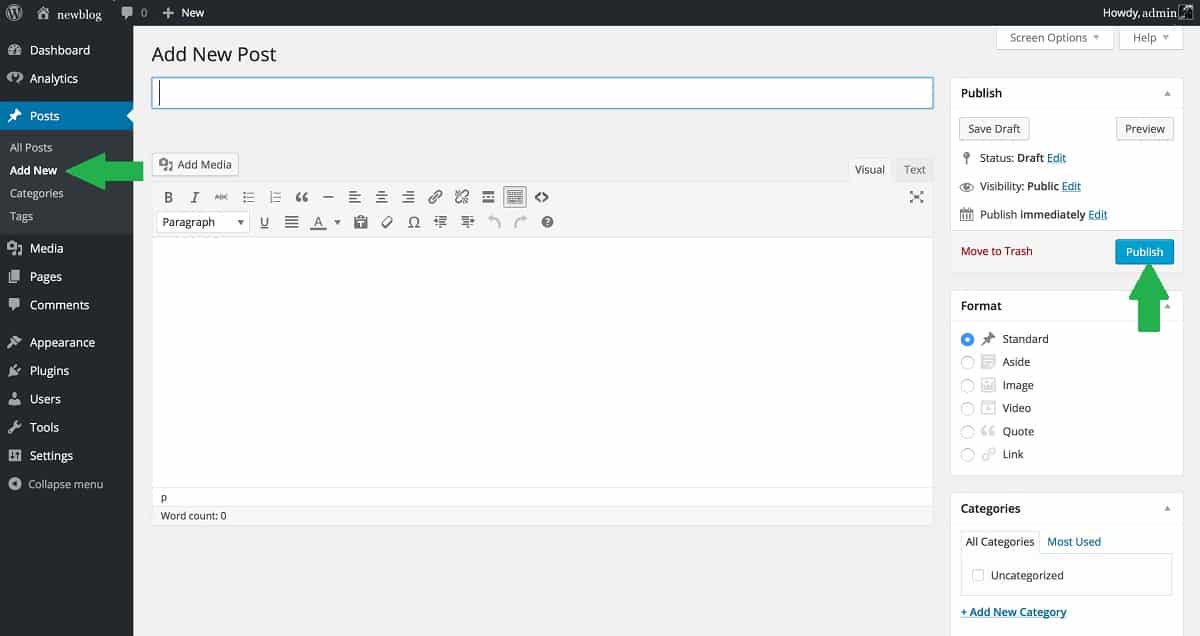
This step will add lot of excitement. You will create your first blog post. To create post you click Posts>>Add New at left side bar.
It opens text editor for you to write your post. Like any editor it has text editing and formatting tools. Text color change, insert links, alignment, underline, bold etc. You can add photos & videos by clicking add media button. You upload image/video and insert in the post. The top bar under add new post is to write the title of the post.
On the right side you can categorize your post by adding categories. Add tags that enables great searching in your blog. Add featured image to show on homepage and category listing.
After you have finished writing. You click Publish button on the right hand side to publish your new post. This posts goes for indexing in search engine.
How To Write Post In WordPress – Learn in detail all the features by watching this video
Created first post is now seen in your blog homepage. It is a joyful experience seeing it.
Now you have learn’t how to start a blog in WordPress. Welcome to the world of blogging.


